Ultimate Fix For Low Disk Space Error

Does your Windows PC show a low disk space error whenever you boot your system? It is one of the most common problems in older computers where cache, temporary files and many other unnecessary files accumulate in the system drive and consume storage space.
It ultimately slows down your computer and causes system crashes. In that case, you either have to buy a new hard drive or free up disk space.
But don’t worry, follow the disk space recovery tips given below to free up disk space in any Windows PC.
Run Disk Cleanup Tool
To run the Disk Cleanup tool, follow these steps:
- Open the “This PC” window.
- Right-click on C drive which is the system drive.
- Click on “Properties.”
- Click on “Disk Cleanup.”
- Check all the available options from the “Disk Cleanup” tool.
- Click on “Clean up system files.”
- It will add system files like Windows update, Microsoft Defender, system error minidump files, etc. that can be removed to save space on your PC.
- Click “OK.”
Turn On Storage Sense
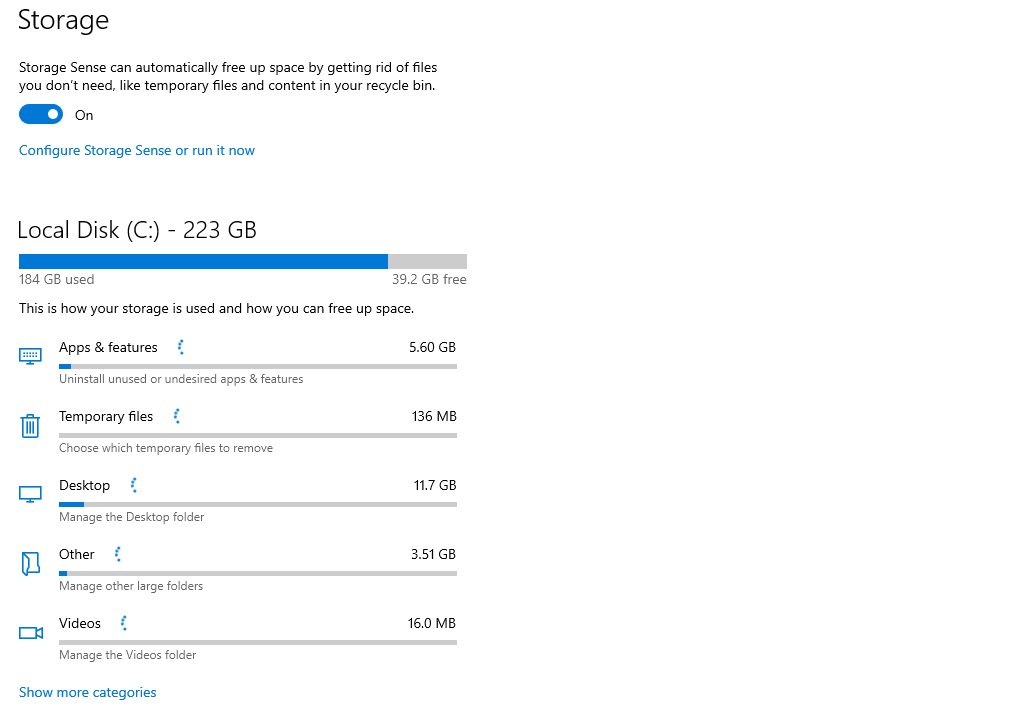
What is Storage Sense?
Storage Sense is a feature unique to Windows 10 and 11 that helps Windows periodically delete unnecessary files like temporary files, Recycle Bin items and downloaded files long left unaccessed in the Download folder.
Users can configure its settings to free up disk space and avoid low disk space errors.
How To Enable Storage Sense In Windows PC
To enable Storage Sense, follow these steps:
- Open Settings: Press Windows + I to open the Settings app.
- Navigate to Storage: Go to System and then select Storage.
- Enable Storage Sense: Find the Storage Sense toggle and turn it on.
How To Configure Storage Sense On Windows PC
After you enable Storage Sense you have to set your preferences for how often it runs and what files it should clean up.
To configure Storage Sense, follow these steps:
- Turn on Storage Sense.
- Click on “Configure Storage Sense or run it now.”
- Under Run Storage Sense, choose how frequently Storage Sense should run its disk cleanup feature.
- Under the Temporary Files section, choose how often you want Storage Sense to delete temporary files.
How To Run Storage Sense Manually
If you want to run Storage Sense immediately, then follow these steps:
- Go to Storage Sense configuration settings.
- Click on Clean Now under the Free up Space Now section.
- This will clean up unnecessary files based on your current Storage Sense settings.
Manage and Delete System Restore Points
Manage and Delete System Restore Points
System Restore Points are essential tools in Windows that allow you to revert your system to a previous state in case something goes wrong, like a software installation failure or system update issue.
However, these restore points can accumulate over time and take up a significant amount of disk space. Here’s a detailed guide on understanding, managing, and deleting system restore points to free up disk space on your Windows PC.
1. Understanding System Restore Points
What Are System Restore Points?
- System Restore Points are snapshots of your system files, installed applications, Windows registry, and system settings at a specific time. They’re created automatically by Windows before significant events like updates, driver installations, or software installations. You can also create them manually.
How They Affect Disk Space:
- Each restore point can consume a substantial amount of disk space, especially if you have many of them or if your PC has undergone multiple updates and installations. Windows allocates a portion of your hard drive to store these restore points. As the number of restore points increases, the amount of free disk space decreases.
2. How to View and Delete Restore Points
Viewing Restore Points:
- To manage and delete old restore points, first, you need to view them:
- Open System Properties:
- Press
Windows + Rto open the Run dialog box. - Type
sysdm.cpland press Enter to open the System Properties window.
- Press
- Access System Protection:
- Go to the System Protection tab.
- Under the Protection Settings section, select the drive you want to manage (usually C:), then click on Configure.
- View Restore Points:
- Click on System Restore and then Next in the System Protection window.
- You will see a list of available restore points with their creation dates and descriptions.
- Open System Properties:
Deleting Restore Points:
- If you decide to delete old restore points to free up space, follow these steps:
- Delete All Restore Points:
- In the System Protection tab, click on Configure for the desired drive.
- Click on the Delete button under Delete all restore points for this drive.
- Confirm the deletion to remove all existing restore points.
- Delete All But the Most Recent Restore Point:
- Open the Disk Cleanup utility:
- Type
Disk Cleanupin the Start menu search bar and open it.
- Type
- Select the drive you want to clean up (usually C:) and click OK.
- Click on Clean up system files.
- Go to the More Options tab.
- Under System Restore and Shadow Copies, click Clean up. This will delete all restore points except the most recent one.
- Open the Disk Cleanup utility:
- Delete All Restore Points:
3. Adjusting Space Allocated for Restore Points
Why Adjust Space Allocation?
- By adjusting the space allocated for restore points, you can control how many restore points are stored, which can help reduce disk usage in Windows. Windows automatically deletes older restore points when the allocated space is full, but by reducing the space, you can limit how many are kept at any time.
How to Adjust Space for Restore Points:
- Access the System Protection Settings:
- Open the System Properties window (using
sysdm.cplas described above). - Go to the System Protection tab and select the drive you want to configure.
- Open the System Properties window (using
- Configure Restore Settings:
- Click on Configure.
- In the System Protection for [Drive] window, you’ll see a slider under Disk Space Usage.
- Adjust the Slider:
- Move the slider left or right to decrease or increase the amount of disk space reserved for restore points.
- The current usage and the maximum usage (based on your selection) will be displayed.
- Apply Changes:
- Click Apply and then OK to save the changes.
It’s a good practice to regularly review these settings, especially if you’re running low on disk space, to ensure that your system remains both protected and optimized for performance.
Disable Hibernation To Free Up Disk Space
What is Hibernation in Windows?
Hibernation is a power-saving feature, especially for laptops, but it can be used on desktops as well. Unlike sleep mode, which keeps your session in memory and consumes a small amount of power, hibernation saves everything in memory (your open documents, running programs, etc.) to a file on your hard drive called hiberfil.sys.
This allows your computer to completely shut down while preserving your session, so you can resume exactly where you left off when your PC turns back on.
How Hibernation Can Cause Low Disk Space
The hiberfil.sys file, where the hibernation data is stored, can take up a considerable amount of disk space. The size of this file is usually around 75% of your system’s installed RAM.
For example, if your PC has 8 GB of RAM, the hiberfil.sys file could consume about 6 GB of disk space. This can be a significant amount, especially on smaller SSDs or older systems with limited storage.
How to Disable Hibernation
Open Command Prompt as Administrator:
- Press
Windows + Xor right-click on the Start menu. - Select Command Prompt (Admin) or Windows PowerShell (Admin) to open it with administrative privileges.
Disable Hibernation:
- In the Command Prompt window, type the following command and press Enter:
powercfg -h off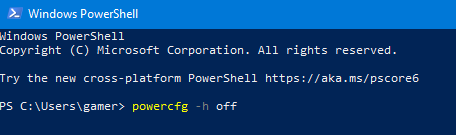
- This command will disable hibernation and immediately delete the hiberfil.sys file from your system, freeing up the disk space it was using.
Verify the Changes:
- To confirm that hibernation has been disabled and the hiberfil.sys file has been removed, navigate to the root of your C: drive (or the drive where Windows is installed) and check for the absence of the hiberfil.sys file.
Re-enable Hibernation (if needed):
- If you decide to re-enable hibernation in the future, simply open Command Prompt as an administrator and type the following command:
powercfg -h on- This will recreate the hiberfil.sys file and restore the hibernation feature.
Enable NTFS Compression
NTFS (New Technology File System) is the standard file system used by Windows operating systems.
NTFS Compression is a special Windows file compression feature that allows users to compress files, folders, sub-folders or entire drives and save them within the Windows file system, without creating a separate compressed file like .zip or .rar.
The compression and decompression process takes place instantly so that you can use it just like any other file on your PC.
How to Enable NTFS Compression

For Files or Folders:
- Right-click on the file or folder you want to compress.
- Select Properties from the context menu.
- In the General tab, click on the Advanced button.
- Check the box next to Compress contents to save disk space.
- Click OK to apply the changes.
For an Entire Drive:
- Open This PC or File Explorer and right-click on the drive you want to compress.
- Select Properties from the context menu.
- Check the box next to Compress this drive to save disk space.
- Click Apply and then choose whether to apply compression to the entire drive or just specific folders.
Disable Windows Search Indexing
Windows Search Indexing is a feature provided to its users where it scans files and folders on your system and creates an index. This index includes information such as file names, content within files, metadata, and more.
When you use the search feature in Windows, the system quickly references this index rather than scanning your entire hard drive, making the search experience on your Windows laptop or desktop smooth.
The index created by Windows Search Indexing consumes a significant amount of disk space, especially if you have a large number of files.
Search Indexing may slow down your Windows PCs having a low disk space.
How To Disable Windows Search Indexing

- Click on the Start Menu and type
services.mscin the search box. Press Enter to open the Services Manager. - In the Services Manager, scroll down and locate Windows Search in the list of services.
- Right-click on Windows Search and select Properties.
- In the Windows Search Properties window, click on the Stop button to halt the service.
- Find the Startup type dropdown menu in the same Properties window and select Disabled.
- Click Apply and then OK to save your changes.
- Restart your PC to ensure that the changes take effect.
After disabling Search Indexing, searches may take longer, as the system will need to manually scan files and folders each time you initiate a search.
By following the steps outlined in this guide, you can quickly free up disk space, and ultimately speed up your computer, and prevent those annoying low disk space warnings from popping up.
FAQs
Why am I seeing a low disk space error?
The low disk space error appears when your computer’s hard drive or SSD is almost full. This can slow down your system and cause performance issues.
How do I check how much disk space I have left?
You can check disk space by going to File Explorer (Windows) or Finder (Mac), then selecting This PC or About This Mac to view the available storage on your drives.
What should I do when my disk space is low?
1. You can free up space by:
2. Deleting unnecessary files.
3. Uninstalling unused programs.
4. Emptying the recycle bin/trash.
5. Using built-in disk cleanup tools.
What are the biggest space-consuming files on my computer?
Large files such as videos, high-resolution images, and software installations take up the most space. You can also use disk management tools to identify large files and folders.
How can I delete temporary files?
On Windows, use the Disk Cleanup tool or type %temp% in the Run dialog to manually delete temporary files. On Mac, you can clear the cache through System Preferences > Storage Management.
What’s the easiest way to free up disk space?
1. Clear out your downloads folder.
2. Move files to external storage or the cloud.
3. Delete old, unused software or apps.
4. Use built-in disk cleanup tools.
How can I prevent low disk space errors in the future?
To avoid running out of space:
1. Regularly clean up unnecessary files.
2. Consider upgrading your storage or using external/online storage solutions.
3. Set up automatic cleanup of temporary files.
Will a low disk space error affect my computer’s performance?
Yes, low disk space can slow down your computer, cause apps to crash, and prevent updates from being installed.
Can I use an external drive to free up space?
Yes, moving large files such as videos, music, and backups to an external hard drive can help free up space.
Should I upgrade my storage if I frequently get low disk space errors?
If you often experience low disk space issues, upgrading to a larger SSD or hard drive may be necessary for better performance and storage capacity.